Ways to Erase Scratches from Vinyl Floors Effortlessly

Many people are searching for methods on how to remove scratches from vinyl flooring effectively. That is the reason why I publish this helpful and fantastic article. I am about to introduce many proper and excellent methods to remove scratches through this post.
Scratches are the tricky problems that usually happen with the vinyl flooring and make the floor unsightly. If you are stuck in this trouble, you are in the right place. You will find all fantastic solutions to solve the issue thoroughly.
The Common Factors That Cause Scratches On Vinyl Flooring
The main material to create vinyl planks is plastic. It provides a beautiful aesthetic, but it is not as durable as wooden floors. Typically, vinyl flooring is not simple to scratch, but if intense forces or sharp objects impact it, it still has a high chance of being scratched.
The leading and common causes of scratches on the surface of vinyl flooring include:
- Moving furniture in the house: Over time, scratches will appear in contact between the legs of the furniture and the floor. In addition, moving furniture improperly will scratch your vinyl flooring.
- Dirt from your feet: This is a significant cause of flooring scratches because it will build up day by day. Dirt clings to your feet, and when you move on the floor will cause it to scratch. Therefore, you can put on a soft mat to wipe your feet.
- Floor cleaning products: The use of chemical floor cleaners also causes floor corrosion. Moreover, cleaning tools, such as brooms, mops, vacuum cleaners will create slight scratches on the vinyl flooring.
- Sharp objects: Sharp objects dropped on the floor can scratch the floor. Furthermore, point toys that your kids rub on the floor will cause deep scratches.
- Pet’s claw: If you have pets like dogs or cats in your home, scratched vinyl flooring is no surprise. Because pets will often scratch their claws on the floor.
- Accumulated water: When you clean the floor with water, it can accumulate under the floor and form bubbles. This makes vinyl flooring easy to scratch and damage.
Discover The Methods To Remove Scratches From Vinyl Flooring
What do you do when you discover scratched vinyl flooring? Do not panic; calmly follow the instructions below to solve this problem. However, before removing scuff marks, you should identify whether the scratch is light or deep to have a reasonable solution.
Clean The Vinyl Flooring Before Removing

After determining the condition and severity of the scratch, you need to clean the scratch location to remove all dirt and stubborn stains on the vinyl flooring surface. This is pretty simple because it is similar to how you clean the floor every day.
Preparation
- Dishwashing Detergent
- Warm water
- Soft cloth
Instructions
Step 1: Prepare a cleaning solution with a combination of a bucket of warm water and ¼ cup of dishwashing detergent.
Step 2: Dip a soft cloth in the cleaning solution and wipe the floor in the area to be scratched.
Step 3: If you find stubborn stains, you should scrub until they are entirely removed.
Step 4: Wait until the vinyl flooring is entirely dry before starting to remove scratches.
Note: You should not let a soft cloth get too wet when cleaning vinyl flooring because it can absorb and affect the lower layers.
Remove The Light Scratches From Vinyl Flooring
Removing light scratches on vinyl flooring is simple and does not cost too much. The methods that I am about to show will help you discard them effectively. Let’s find out the fantastic techniques right away.
Method 1: Quickly Remove The Scratches By Using A Tennis Ball

The tennis ball is an effective way to remove minor scratches caused by shoes and pet claws. The process is straightforward but highly effective. Please prepare the following and stick to my instructions.
Preparation
- A tennis ball
- Rubber (Optional)
- Alcohol
- Soft cloth
Instructions
Step 1: Use the tennis ball in your hand to rub over the scratches until they are completely gone. You can also use rubber if you do not have a tennis ball (Optional).
Step 2: In case you still find faint scratches on the vinyl flooring surface, you can add a little alcohol on a soft cloth to wipe the blemishes to get rid of them entirely.
Find out how to discard light scratches on the floor with a tennis ball.
Method 2: Removing With Toothpaste

Toothpaste is something that is always available in your home. In addition to teeth whitening, it is also useful in removing light scratches on vinyl flooring effectively.
Preparation
- Toothpaste
- Clean cloth
- Damp cloth
Instructions
Step 1: Put a small amount of toothpaste on a clean cloth.
Step 2: Use force to rub the scratches in a circular motion.
Step 3: After you have removed the scratches, you should use a damp cloth to wipe the work area and let it dry.
Method 3: Discard Scratches With Eraser

If you do not have a tennis ball on hand, you can use an eraser to discard light scratches on the floor. You just need to follow the steps you would remove with a tennis ball to get clean vinyl flooring.
Method 4: Eliminate Light Scuffs By Using PU Cleaner
Handling light scratches on vinyl flooring is pretty straightforward with PU cleaner. Scuffs will be smoothed and wholly removed with PU cleaner. In addition, it makes the floor shiny after work.
Preparation
- PU cleaner
Instructions
Step 1: Once you have cleaned and sanded the scuff area with a white sanding pad to discard the edges of the scuffs, you will start with shaking the PU cleaner for 20 seconds.
Step 2: Stand at a distance of 30 to 40 centimeters from vinyl flooring.
Step 3: Bring out scratches by spraying PU cleaner on them.
Step 4: Wait for 5 to 10 minutes for the PU cleaner to dry.
Step 5: Continue to spray the next time until the scratches are gone (about 3 times). You should apply a break between each spray of 5 to 10 minutes.
Step 6: Once you have finished getting rid of the light scuffs with the PU cleaner, you should wait about 6 hours before walking around and stomping on the area.
Method 5: Wax The Flooring With Car Wax Or Wearwax
When you notice the light scratches on the vinyl flooring, you can wax the floor to remove them and bring back the shine, smoothness, and beauty. You should use high-quality wax, like car wax, to beautify your vinyl flooring.
Preparation
- Car wax
- Wearwax (optional)
- Clean cloth
Instructions
Step 1: Add an appropriate amount of car wax on a clean cloth.
Step 2: Apply to previously treated scratch area.
Step 3: Move your hand in a circular motion to spread the car wax evenly over the scratched area.
Step 4: Keep repeating until you get the shine and smoothness you want for the floor.
Step 5: Get rid of excess wax on the floor surface.
Step 6: Use a clean cloth to wipe down the entire waxed area, and you will have a slick floor that is free of any scratch.
Note: You do not wax the vinyl floor when you replace a deeply scratched plank with another.
You need to select the proper color wax when buying it. The color of wax has to be the same as the color of your vinyl flooring.
Listen to the directions to wax a scratched vinyl flooring.
Method 6: Use PU Repair Pen To Remove
A PU repair pen is a fantastic savior for plastic products that appear scratches or breaks. You can use it to clean deep scuff marks with a few simple and convenient operations.
Preparation
- A PU repair pen
- An enclosed plastic wedge
- Soft cloth
- PU spray bottle
Instructions
Step 1: You can pre-treat the scratches with an enclosed plastic wedge to discard the edges of the scratch after sanding.
Step 2: Shake the PU repair pen for about 15 seconds.
Step 3: Open the cap of the pen and force the tip of the repair pen into the soft cloth.
Step 4: Apply gentle pressure to the spot stained with the letter “P” on the bottom of the brush head to flatten the repair pen.
Step 5: If you want to bring the paint down to the brush head, you need to continue to let the tip of the pen point down on the soft cloth and press the point “P” one more time.
Step 6: Use a soft cloth to wipe the brush head, so it does not contain too much paint.
Step 7: Remove scratches on vinyl flooring by painting over them.
Step 8: Wait 10 minutes.
Step 9: Continue drawing with the repair pen about 3 more times.
Step 10: Spray PU in the scratches with a PU spray bottle to help the floor become brighter and more beautiful. You can do the same as you did to treat light scratches with PU cleaner.
Remove Deep Scratches On Vinyl Flooring
When faced with deep scratches, removal is a bit more complicated. However, there are still many effective options to help you do this. You can select one of them to match the condition as well as the items in your home.
Option 1: Sanding The Vinyl Flooring To Get Rid Of Edges

Sanding the scratch will help remove sharp edges and smoothen the surface of the scratch to remove them. This can entirely discard deep scratches.
Preparation
- P320 grit sandpaper
- P500 sandpaper
- P800 sandpaper
- Soft cloth
- Mild clean solution
- Clean water (optional)
Instructions
Step 1: After cleaning the floor, you should use P320 grit sandpaper to scrub the scratches in a similar direction when wiping. It can remove the edges of light scratches.
Step 2: Eliminate the old wax from the floor with the P500 grit sandpaper in a circular motion at the scratch area.
Step 3: Using the P800 grit sandpaper to scrub again can remove the edges of stubborn scratches. If you are persistent, you can remove deep scuffs. You will stop when the floor becomes smooth, and you cannot feel the scratches when you touch it.
Step 4: Dip a soft cloth in a mild detergent solution or clean water to wipe the entire sanded area.
Option 2: Using Rubbing Alcohol
When detecting stubborn and deep scratches on vinyl flooring, you can hardly remove them with simple tools. In this case, rubbing alcohol that contains 70 percent of pure isopropyl alcohol is a good choice for removing scratches without harming the floor (1).
Preparation
- Rubbing alcohol
- Soft cloth
- Hairspray (optional)
Instructions
Step 1: Dip a soft cloth in rubbing alcohol. You should dip moderately and should not let the cloth get too wet.
Step 2: Rub on the scratches a few times.
Step 3: For rubbing alcohol to break down and discard scratches more effectively, you should keep the soft cloth soaked in alcohol over the scratches for about 30 seconds.
Step 4: Continue doing the above process again until you can no longer see the scratches on the surface of vinyl flooring.
Note: You should not combine rubbing alcohol with other cleaning agents. In particular, do not use it with bleach and stay away from fire when using it.
If rubbing alcohol is not available in your house, you can use hairspray instead. The alcohol content is about 50 to 60 percent, so it can get rid of the scuffs efficiently. To use hairspray, you just need to apply the exact instructions with rubbing alcohol. However, it is necessary to prepare a wet cloth to wipe the hairspray because you can remove hairspray residue after it sticks to the floor.
Option 3: Using PU Cleaner
Besides detaching light scratches on vinyl flooring, PU cleaner is also a fantastic option for dealing with deep scratches. The instructions are the same as when you use it for light scratches, but the dose will be more.
Option 4: Using Baking Soda
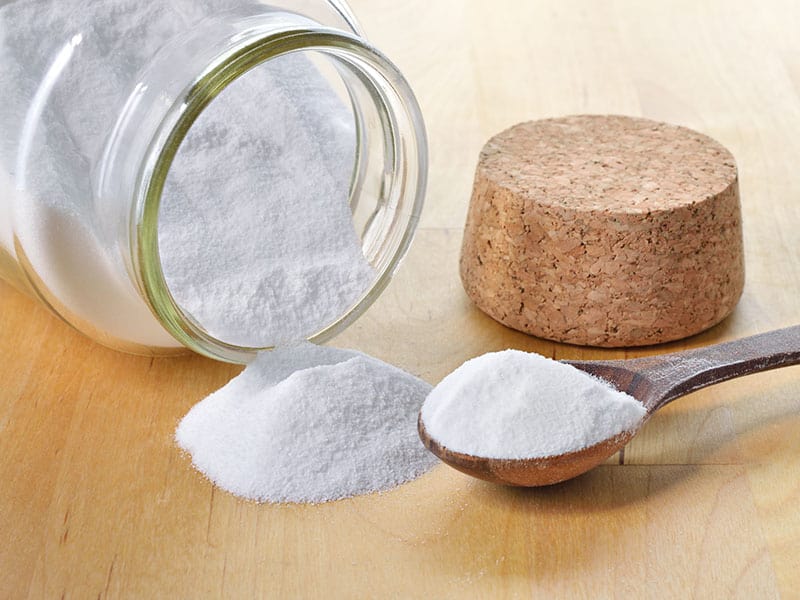
Baking soda is a potential alternative that you can consider when getting rid of scuffs on vinyl flooring. Baking soda is also called sodium bicarbonate and includes the NaHCO3 component (2). It is helpful to you in removing scuffs. Let’s see!
Preparation
- Baking soda
- Water
- Rough cloth
- Toothbrush (Optional)
- Damp cloth
- A bowl
Instructions
Step 1: You will prepare a bowl and add water and baking soda in the ratio of 1:3.
Step 2: Stir the mixture well.
Step 3: Dip a rough sponge or toothbrush (optional) into the baking soda and water mixture.
Step 4: Gently rub over the scuffs until they fade and disappear.
Step 5: After using baking soda, you should wipe the work area with baking soda by using a damp cloth to eliminate all the baking soda on the floor.
Option 5: Use PU Repair Pen To Remove
A PU repair pen can remove heavy scratches from vinyl flooring. It is a versatile option, isn’t it? You can apply the PU repair pen manual in the light scratches removal section because the two cases are similar.
Option 6: Repair The Scratches On Vinyl Flooring With Liquid Joint Sealant

Liquid joint sealant is one of the effective options that you can use to repair deep scratches on vinyl flooring. This is a method that is both easy to implement and find.
Preparation
- Tape
- Wear mask
- Liquid joint sealant
Instructions
Step 1: Since the smell of the liquid joint sealant is pretty intense; you should wear a mask and open all the windows before using it.
Step 2: You will apply tape on the area needing to be removed.
Step 3: You can use a tool to help you apply the liquid at the same level as others, but if you do not have one, a small amount of liquid joint sealant should be applied to the scratched area.
Step 4: Wait for the liquid joint sealant to dry completely.
Step 5: Once you check it and determine it is dry, you will proceed to remove the tape.
Option 7: Remove With The Magic Eraser
Another fantastic way that you can apply to take scratches away is the magic eraser. You can use it with light scratches, but it can also discard deep scuffs. The procedure, in this case, will be slightly different than when used for light scratches.
Preparation
- Clean eraser
- Water
Instructions
Step 1: Use water to bring moisture to the magic eraser.
Step 2: Gently wipe to remove the excess water on the magic eraser.
Step 3: Use a magic eraser to scrub the scratches on the vinyl flooring until the scratches are no longer noticeable.
Note: To prevent vinyl flooring from getting dirty, you should use an eraser that does not stick to any stains.
Option 8: Applying Lighter Fluid

Lighter fluid is an effective tool for discarding stubborn scratches on different types of floors. For vinyl flooring, it also gives a pretty perfect effect.
Preparation
- Lighter fluid
- Clean cloth
- Damp cloth
Instructions
Step 1: Use a clean cloth to absorb lighter fluid.
Step 2: Rub the scratches on the floor until you can no longer see them.
Step 3: Use a damp cloth to clean and remove the excess lighter fluid.
Step 4: Wait until the floor is completely dry.
Note: You should wear gloves and glasses to protect your hands and eyes when using lighter fluid because it is pretty toxic.
Option 9: Over-The-Counter Method
This is a product created for the purpose of removing stubborn scratches. This option is suitable for all types of flooring, but you should also carefully read the manufacturer’s instructions for appropriate use for each type of flooring.
To remove a deep scratch with over-the-counter, simply place it on a cloth and rub the scratches as lighter fluid instructions. Let’s look again.
Option 10: Using WD-40

Another commercial product that is also suitable for removing deep scuff marks is WD-40. You will need to go through the same scrubbing and cleaning process with a damp cloth as using lighter fluid above.
Option 11: Replace A New Flooring

When the scratch condition of the floor is too severe, and you cannot remove it with the above options, the only practical way that you can apply is to replace the scratch area. The geometric texture of vinyl flooring allows you to replace plank when the floor fails.
Preparation
- Vinyl flooring plank
Instructions
Step 1: Prepare a new plank and leave it in the room for about 2 days to acclimate to the temperature and environmental conditions inside the room before replacing the deep scratch plank.
Step 2: Locate the exact location of the scratched board and its row in the floor structure.
Step 3: Disassemble the baseboard of the vinyl floor gently and slowly so as not to disturb the parts below.
Step 4: Remove the other planks so that you can reach the scratched board.
Case 1: Floating floor (luxury vinyl flooring): This type is not fixed to the floor with glue, so you can easily remove it. Once you have access to the damaged board, you will remove it and install the new board.
Note: You need to make sure the new plank is adequately fitted and looks good.
Case 2: Glue-down floor:
- You will place the flat underneath the board and dislodge it.
- Remove all the glue with a scraper and clean the area around the plank before installing the new board.
- Apply glue to the new board and use a brush to spread it evenly.
- Wait a few minutes for the glue to dry.
- Put the board in place and press it down so that it sticks to the floor.
- Wipe off excess glue with a cloth and water.
Step 6: Install the remaining boards and baseboard back.
You can apply these instructions to replace vinyl flooring.
Buff The Vinyl Flooring To Make It Shine
Another step to beautify the floor is to remove visible scratches and make the floor shiny by polishing. You only should buff deep scratches. To buff the vinyl flooring, you need to do it carefully and evenly.
Preparation
- Clean cloth
- Elbow grease
- Electric buffer (optional)
Instructions
Step 1: Pour elbow grease on a clean cloth.
Step 2: Buff on the scratched area that has just been removed in circular motions
Step 3: Continue buffing until the floor is as shiny as you expected.
Note: You can use the electric buffer if you want more efficient polishing and save time and effort buffing vinyl flooring.
Extra Tips To Prevent Scratches On Vinyl Flooring
While you can remove scratches on vinyl flooring easily, it is best to prevent them from appearing. Check out the tips below to protect your vinyl flooring from scratches.
- Place a vinyl flooring-friendly woven rug in front of the door. You should not use rubber mats. Placing a mat will help you remove dirt and debris before entering the house to reduce the possibility of scratches.
- You should place carpets in areas of vinyl flooring that you will come into contact with and step on a lot to limit the appearance of scratches.
- You need to move the furniture gently and carefully. Lift it a little off the floor to move and set it down gently.
- Attach rubber guards to the bottom of the furniture so that the floor does not get scratched by an intense impact from the heavy furniture.
- You should have a separate play area for children to put pointed toys so the kids will be less likely to use them to scrape on the floor, causing damage to the floor.
- You should clean, sweep, and sanitize vinyl flooring regularly to remove sharp objects that can scratch the floor. In addition, it also helps to remove dust and keep the floor clean. After cleaning, you should rinse the floor with clean water to avoid discoloration.
FAQs
The questions below will answer other prominent issues on this topic. If you miss them, your knowledge in this area will not be complete.
Remove Scratches As Soon As Possible
The appearance of this article will probably give you more peace of mind about your vinyl flooring. You can handle light to stubborn scratches on vinyl flooring easily and quickly. Let’s bring a shiny and smooth look to your vinyl flooring right now.
You need to share this post to spread this helpful information and tips to those who need it. I am happy to respond to your questions about removing scuffs from vinyl floors, so let me know your problems in the comments. Thanks for your time!

Samantha Lee
Head Cleaning Expert
Expertise
Professional Home Cleaning, Green Cleaning Techniques, Stain Removal & Fabric Care, DIY Home Maintenance & Organization, Sustainable Cleaning Products, Home Care for Busy Lifestyles
Education
University of Denver
Samantha Lee is the Head Cleaning Expert at HomeCleaningForYou.com, specializing in eco-friendly home care. She holds a Bachelor of Science in Environmental Science from the University of Denver, focusing on sustainable cleaning solutions.
With expertise in green cleaning, stain removal, and DIY home maintenance, she helps homeowners keep their spaces fresh and chemical-free. Samantha has been featured in lifestyle publications and has partnered with brands promoting natural cleaning products.
She also shares practical tips through her blog, online courses, and workshops. Passionate about sustainability, she enjoys testing new eco-friendly cleaning methods and spending time outdoors.